Day 6 & 7: Welding Weekend
- Heather Calvert
- Nov 16, 2020
- 6 min read
Structural Improvements & The Ultimate Wheel Makeover
Last week in our horse trailer renovation, we discovered an area on the frame above one axel that looked to have worn quite thin. Concerned about the structural integrity, I wanted to have a local welder take a look and make the call. Both fingers and toes were crossed that this was not going to be structural, and result in a hefty unforeseen repair expense!
After speaking with a local shop, I was relieved to find out that the area was not as thin as I had thought and according to their advice, adding a simple reinforcing bar should do the trick. He also instructed to use a needle scaler to remove the multiple layers of flaking steel before adding the reinforcement. I luckily knew what the needle scaler was from my prior research on YouTube, but unfortunately no one in the family had one for me to borrow.
Stepping back, I had earlier reached out to one of my best friend’s husband, Jon, for help welding other parts of the trailer. He and his dad both knew how, own all of the equipment and his dad even has his very own workshop big enough for the trailer! They very kindly agreed to help a friend in need!
I checked with Jon to see if he had the needle scaler and could also weld on the reinforcing bar in addition to the other areas we had already planned. Thankfully, he had the tool and said the extra bar was no problem, so we arranged a weekend to bring “Betsy” over to the shop for her “osteology appointment!”

Arriving at the shop we devised our to-do list which included the interior fender wells, exterior fender steps and repairing the hole in the barn door in addition to the new frame work. We certainly had lot of work to do!
Frame Reinforcement
We decided to start on the frame and tackle the needle scaling. Once the thick layers of corrosion were removed we would have a better understanding of the extent of the wear.
I was very excited to learn and try this new tool that, to me, looks like a squid! How something that does not have sharp ends can break away metal with vibration was pretty impressive to me. If you have not used one before, it is a nozzle attachment to an air compressor and to be the most effective, it should be held 90 degrees to the surface that you are working. By applying the pressure from above, it better chips away the debris around it. It didn’t feel natural being perpendicular, so it took a few times and some instruction to not hold it on an angle as if I were painting. You can hold it on an angle when you are trying to loosen a ridge, but then you attack from above to get the debris to fully break way.
After we had removed a significant amount of buildup, the frame was looking better already! The next step was to go over the surface with a grinder to further smooth the area. With a good dusting from an air gun, the metal was ready to be treated and sealed to prevent further rust damage. It was at this stage I received some great news!


Turns out, the area I was worried about, was actually perfectly fine! The area looked to have been worn and concave due to the rust debris build up surrounding it. With the surface now descaled and smoothed, you could see the steal had the uniform thickness to the rest of the frame. Thank goodness! I spray painted the area with undercoating and we ticked that line off of the to-do list!
Barn Door Repair
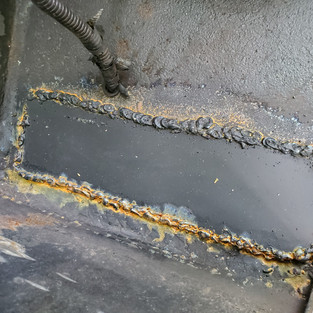
The bottom lip of the rear passenger side barn door had an area that had completely rusted through and needed to be patched. This had been caused by poor water drainage with the way the lip was folded in the manufacturing process.

The plan for this area was to cut out the damage and grind down to bare metal to create a clean, even surface for the patch to be welded to. Here was where the heavy duty equipment was coming in! Jon and his dad gave me a welding helmet so I could watch the process, and after joking that I felt like the lady from Flashdance, I got to see the sparks fly as Jon worked on the patch.


I know there are various levels of helmet since they are a major protection to your eyes, but let me tell you, even with the helmet on, it was so bright I couldn’t really watch too closely. Still, I enjoyed learning about the chemistry of welding, how it works and what the machine does.
Once the patch was cut to size and attached, I got to step in and help with grinding the area smooth in order to later paint.


Fenders
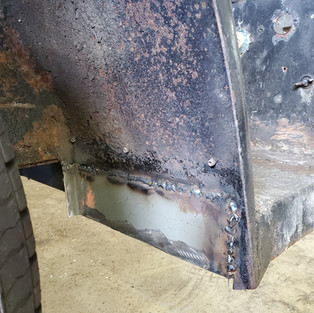
Sadly, the interior fender wells (the area around the tires that stop gravel from being kicked up while driving) were quite damaged and rusted completely through. Not only did it look terrible, the areas needed to be patched in order to pass the MD state inspection so that I could get the tag and title in my name.
In this same area, the rear exterior fender steps on both sides had significant damage that also needed attention.
Working our way around the trailer, we jacked up the sides and removed the tires to gain easier access to the space. Following the same methodology as the barn door repair, the affected areas were cut out and a patch was then cut to the right size, then welded into place. Once they were welded, they were grinded down. Any areas that we were not able to grind due to the tight space, I will smooth out with Bondo later on.
Jon and his dad took over this process and as each tire was removed, I worked on the beautification makeover of the wheels.
Ultimate Wheel Makeover
It is no secret that the wheels of the trailer were in some serious need of TLC. On day 2 when we began work on de-rusting, we started the process of making the wheels more visually attractive. The prominent rust was removed and treated to stop further spreading and they were scrubbed clean with degreaser. Despite this effort, the enamel coating was still chipped, the color was a yellowish eggshell white and they lacked appeal.
I purchased Rustoleum’s metallic silver spray paint to breathe new life into old wheels. In order to protect the tires from getting unwanted paint on them, I needed to devise a method to block off the area – easier said than done!
At first, I attempted to only use painters tape around the rim but this would not stick – AT ALL.
LIVE & LEARN TIP: To aide the sticking of painters tape on rubber tires, treat the area with degreaser first.
After googling another method, we found that others used playing cards to slide into the crack around the rim. Brilliant, but we had no playing cards! Plan B – through trail and error I discovered that if I wiped the area first with degreaser, it cleaned the surface well enough for the tape to now stick.
I still needed to protect from the over spray so I created a template from craft paper to cover the remaining tire surface.
Scroll through the photos below to see the progress!
The challenges continued, however, when I sprayed the first coat. Because it was a shiny metallic paint, it was thin and you could still see the printed red lines on the wheels and the dark patches where the enamel had chipped and no amount of coats were realistically going to cover them.
Jon to the rescue! His dad had a variety of spray paints that included a can of light grey enamel primer. Trial and error again, I found that a base coat of this primer covered the original wheel colors, then applying the metallic as the top coat was a winner.

The results were amazing! I couldn't believe how much better the whole thing looked with freshly painted wheels, caps and lug nuts. Side note: I will likely still buy new lug nuts but for now, I wanted to see the completed look!

Wheel Well Undercoating
Once the inner fender well was patched and before the newly painted wheels were reinstalled, I sprayed the whole inner wheel well with black Rustoleum undercoating, the same way I had sprayed the frame last week.
Again, the results were dramatic. I was really feeling we had accomplished so much and have made a great leap forward with restoration!


Many Thanks
The days were very long and the heat/humidity was terrible but I really enjoyed learning new things, spending time with friends and making so much progress!
I want to give a huge thank you to Jon and his dad for their help, his wife and my dear friend, Monica, for stopping by with the greatest subs I have ever had and my parents for coming and feeding us all pizza!
Love, paint & Flashdance,
Heather


Comentários