Day 22: Sheer Refinement
- Heather Calvert
- Mar 18, 2021
- 4 min read
Touch-ups Leave the Trailer Looking Fabulous
If you have not seen the time lapse video from last week where we cut out the new service window, I encourage you to check it out!
I was so excited and happy with this huge milestone accomplishment and could not wait to get “Betsy” home to refine the progress even further.

Service opening
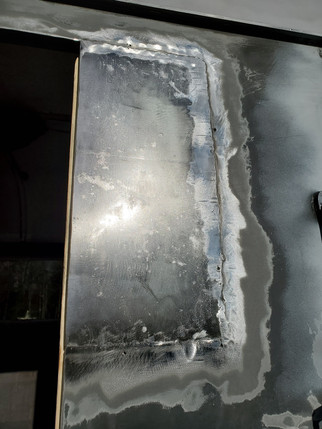
Thanks to our friends, The Traveling Pheasant mobile coffee bar now had the original window removed, the service opening cut out and the excess openings patched.
The patches were needed on either side of the new cut as the original window hole was wider than the new service area. Yes, this was more complicated (as I tend to be) but my vision includes adding decorative exterior sconces on each side of the service area. This required additional effort instead of simply using the original width for the opening, but I know it is going to be worth it!
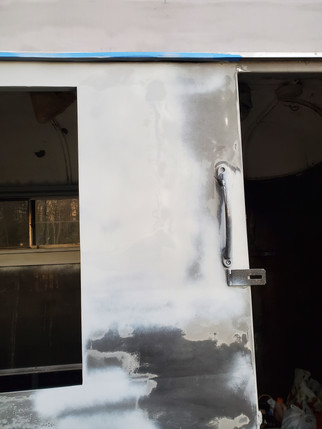
The newly welded patches were grinded down to remove the leftover welding metal but some more work was needed once the trailer was back home. I did additional grinding to level out the metal surfaces, applied Bondo to fill the cracks and to further level the area, did some detailed sanding and then it was ready to be primed!

It goes without saying that I was in love with the results! So smooth, you would never know all that was done and what had gone before.
Fender Step
Not related to the service window work, yet on the same side, was the fender step. You can see all the work we did to this area from our welding post, but now that such great improvements have been done on the exterior, it became quite clear that this step needed additional work. Driven mainly that it would be a very visible area while customers are ordering, I added this to the agenda today.
The area was left with the welded surface and the original surface not completely leveled off and blended together due to the difficulty to sand and grind in a very tight space and around tail light wires. Deciding to give it another try, I started with the grinder to remove the primer and level as much as possible, then gave it another round of Bondo to build up the surface even further.
After this (3rd?!) round, I was finally satisfied with how the surfaces were blended at last!

Interior Frame
While the Bondo progress on the exterior was hardening, I focused my attention back to the interior. The driver’s side window frame was now in need of the same attention that was given to the service side.
Originally, I planned to replace this window with a new custom one. I am not a fan that the windowpanes are plastic and from years of wear, they have quite a few scratches on them and do not let in the best light. After some further research and thought, I decided that I will keep the window for now – with the plan to replace the plastic panes with new glass ones. I think that replacing the window completely would take away from that still present underlying equestrian style that is fundamental to the brand. Ideally, I would love for them to open like awning windows (to match the front window) instead of the sliders, but we shall see...
The area around the window was showing signs of re-rusting in addition to having the same stubborn gooey paint in some areas. Not to mention the top of the frame that meets the ceiling was so dirty and eroded that it was in need of some serious TLC.

I started by using the heavy-duty grinder to remove us much as possible, as quickly as possible. For the stubborn remainder, I whipped out my trusty hand sander and even used a little acetone and scraper action for the stuck-on goo zones. As I was following the frame above and around the window, I got carried away and also refinished the frame forming a portion of the side door too! Once all was smooth, I made sure to treat everything with the rust inhibitor before priming.
With the area wiped down and vacuumed to remove any possible remaining dust, I taped around the window and set to work with the primer. I have to say, I think it looks amazing and good as new, but I know I am partial!


Ending 2020
What a year! After my job shifted me to part time and eventually to furlough, I leaped in and started this business and horse trailer conversion. Looking back on the trailer’s renovation progress over the last 5 months is something that still surprises me when I stop long enough to appreciate how far we’ve come.
I bought “Betsy” at the end of July and everything started with her deep cleaning pressure washing the beginning of August. Since then, we have done countless rust treatments, sanding on both the interior and exterior, frame restoration, welding, Bondo patching and gone through endless cans of primer.
There has been so much progress, but there is still loads more to do and the journey is long.
Next week’s post officially marks the start of progress in 2021! We are finally catching up to sharing updates with you in real time. Now that the weather is beginning to break, we are ready to hit the ground running again – free of frostbite and snow!
Spray primer at the ready,
Heather


Comments